
INTRODUCTION :
A benchtop jointer-planer is a woodworking machine used to produce a flat surface along a board’s length. As a jointer, the machine operates on the narrow edge of boards, preparing them for use as butt joint or gluing into panels. A planer-jointer setup has the width that enables surface planing and leveling the faces of boards small enough to fit the tables.
The jointer derives its name from its primary function of producing flat edges on boards prior to joining them edge-to-edge to produce wider boards. The use of this term probably arises from the name of a type of hand plane, the jointer plane, which is also used primarily for this purpose.
A jointer’s table arrangement is designed with two levels like a narrower thickness planer so that it consists of two long, narrow parallel tables in a row with a cutter head recessed between them, but with a side guide. This cutter head is typically driven by an electric induction motor. A moveable fence is normally set perpendicular to the tables, though some models may allow settings to various angles.
These benchtop jointer tables are referred to as the infeed and outfeed, the table from which the work piece is fed into the machine and the height reference table on which the work piece is floated over lightly as leaves the machine’s cutting head. The blades are adjusted to match the height and pitch of the outfeed table. The work piece to be planed flat is placed on the infeed table and passed over the cutter blade head to the outfeed table, with care taken to maintain a constant feed speed and downward pressure.
The cutter head contains two or more knives (blades) which are honed to a very sharp edge. The blades are arranged radially in the cylindrical cutter head such that their cutting edges protrude from the cutter head so that they will come into contact with the workpiece board being cut as the cutter head spins. The cutter head’s axis of rotation is parallel to the table surfaces and perpendicular to the feed direction. The cutter blades cut into the board in the direction opposite to the feed.
Here, I make a benchtop jointer from electric planner and plywood. This benchtop jointer is very accurate and very useful for woodworking workshop.
Parts Used :
- Electric planer
- 3 Plywood pieces of (24”*8”) 18mm thickness for base part and planer support
- Plywood piece (24”*3”) 18mm thickness for workpiece support
- Plywood piece (24”*3”) 18mm thickness for base support
- 2 Plywood Pieces (6”*3”) 18mm thickness for cover two sides (64mm hole on these both plywood pieces)
- Plywood piece for infeed
- Plywood piece for outfeed
- 3 Nos. 3” C-Section channel (1” length) for infeed and outfeed support
- 2 Nos. metal pieces of (1.25”*3”) 6mm thickness
- 2 Nos. metal pieces of (1.25”*4.5”) 6mm thickness
- 3/8 Bolt with flynut and washers (5” length)
- 6 Nos. 5/16 Allenky bolts with fly nuts and washers
- 4 Nos. 5/16 Allenky bolts with fly nuts and spring washers (cutting head)
- Screws
How to make :
First step is to cut all plywood pieces needed for this benchtop jointer. Cut 3 Plywood pieces of (24”*8”) 18mm thickness for base part and planer support. 2 plywood pieces for two side of the jointer and the 3rd one is for base part. Also cut Plywood pieces of (24”*3”) 18mm thickness for base part support
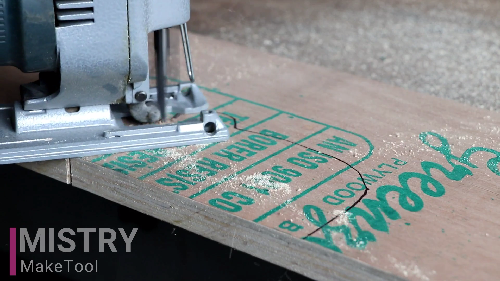
After that, make slots on two plywood pieces (two sides) for planer support by using of jigsaw machine as shown in the image.

Drill 3/8 hole on both the plywood pieces of two side for 3/8 bolt to fix the position of the electric planer.
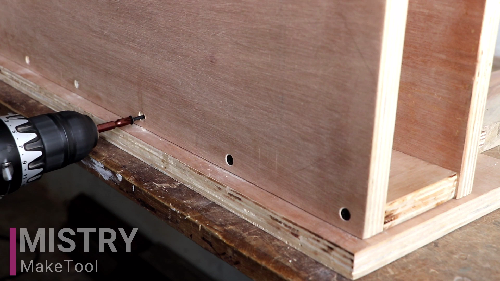
Attach all these plywood pieces using of screws as shown in the image.

Next step is cut 2 plywood pieces of (6”*3”) 18mm thickness for other two sides of the jointer. Drill 64mm holes on both these plywood pieces using of 64mm hole saw cutter. Attach both these plywood pieces using of screws.
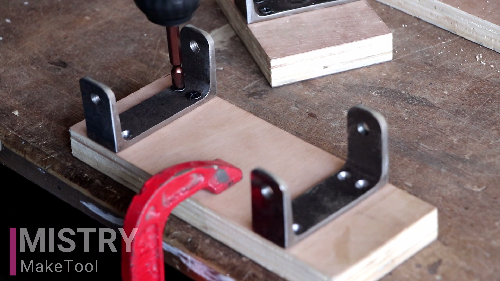
Next step is to cut laminated plywood pieces of (8”*3”) and (4.25”*3”) 18mm thickness for infeed and outfeed of the jointer. Attach 2 nos. 3” C-Section channel (1” length) on infeed plywood pieces and one C-Section channel (1” length) on outfeed plywood piece using of screws.

Make slots on two plywood pieces (two sides) of the jointer using of drill bit and square file. Attach infeed and outfeed plywood pieces using of 6 nos. 5/16 Allenky bolts with fly nuts and washers. By using of these slots and allenky bolts with fly nuts, we can adjust the depth of cut.
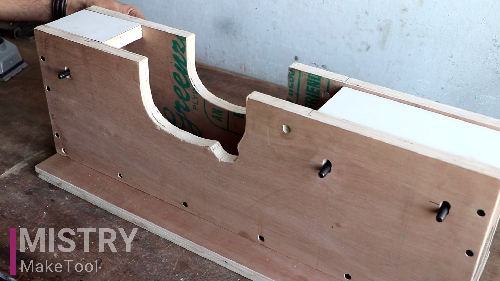

And the last step is to make a workpiece support. I have used laminated plywood piece of (24”*3”) 18mm thickness for workpiece support. To attach workpiece support with the jointer, I have used 2 nos. metal pieces of (1.25”*3”), 2 nos. metal pieces of (1.25”*4.5”) 6mm thickness, 4 nos. 5/16 Allenky bolts with fly nuts and spring washers.
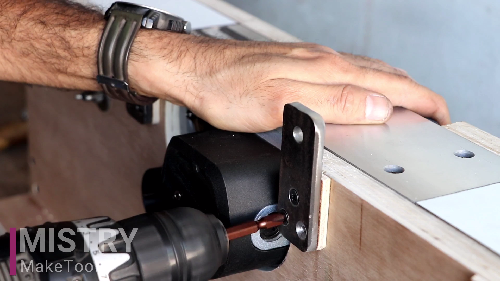
So first, attach these 4 nos. metal pieces with the jointer. I have used 5mm plywood pieces to attach with these metal pieces for create a distance with the jointer as shown in the image.

Then after, cut the head of the 4 nos. 5/16 Allenky bolts and fix these bolts on the workpiece support plywood piece using of glue, as shown in the image.

Attach this workpiece support plywood piece with the jointer using of bolts, spring washers, washers and flynuts.
The benchtop jointer is now ready to use.

